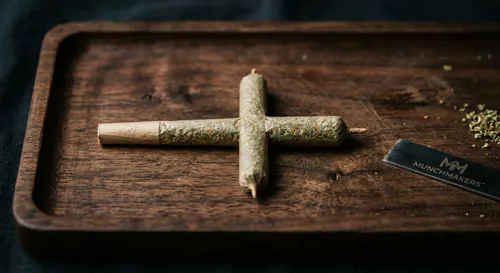
A cross joint is one base joint with a smaller "crossbar" joint pushed through holes punched in the middle. All three ends light at once, all three burn into the same chamber, and you get a triple-strength hit. The trick is the seal — done badly the airflow is wrong and only the longest end burns. Done right it works exactly like Pineapple Express promised.
Below: the materials, the puncturing technique, the airtight seal, and the lighting sequence that gets all three ends burning together.
Materials you'll need
Three joints: one large, two small. You want the large joint to be king-size length and reasonably thick. The two smaller joints should be about two-thirds the length of the main one and about half the diameter. You also need a thin needle or pin, a gum strip torn from a spare piece of rolling papers, and a lighter or matches. Building this on a rolling tray helps keep everything organized.
The large joint is the spine. The two small ones form the cross bar. Think of it structurally: the crossbar joints pierce through the large one, and the airflow from all three paths meets in the center and travels to the filter end where you draw.
Step 1: roll the main joint
Roll a large joint with a filter using filter tips. King-size papers work best. Make it solid -- this joint needs to be structurally rigid because you're going to push a needle through it and then thread another joint through the hole. A loosely rolled main joint will collapse when you try to make the pierce. Pack it firmly but not so dense that it won't draw. Leave the tip end twisted but accessible.
Set the main joint aside.
Step 2: roll the two small cross joints
Roll two thin joints using regular sized papers. No filter on these. They need to be hollow in the center for the critical airflow step you'll do in a moment. A thin, even cylinder is the goal. Twist both ends closed.
Now here's the step most tutorials skip: before the cross joints go into the main joint, you need to create a hollow channel through the center section of each one. Untwist one end of each small joint. Use your needle to gently push a narrow channel through the center of the small joint from the open end partway through. You're essentially creating a through-line so that when the small joints are pierced through the large joint, air can flow from both burning ends of the small joints inward toward the center intersection and then down through the large joint to the filter. Without this hollow channel, the cross sections will burn but won't draw. This is the most common mistake that makes cross joints not work.
Step 3: pierce the main joint
Find the center point of the main joint. You want to pierce about 40-50% of the way down from the tip, closer to the center of the herb section. Too close to the tip and the cross will fall apart as it burns. Too close to the filter and you won't have enough paper to seal the joint.
Push the needle through the main joint horizontally, rotating it slightly to widen the hole. You want the hole to be just large enough for a small joint to pass through with slight resistance. Too tight and you'll tear the joint when threading. Too loose and the seal won't hold. Take your time with this. Wiggle the needle in a circular motion to open up the hole gradually.
Make a second pierce directly opposite the first, so the two holes are collinear. The cross joint will pass through both holes.
Step 4: thread the cross joints
Take one of your small joints and gently push it through both holes in the main joint until it's centered. An equal length should extend from each side. This part takes patience. Work slowly and rotate the small joint as you push to avoid tearing the paper on the main joint. If the fit is too snug, widen the holes slightly with your needle.
If you're making a true cross with one crossbar joint, you're done threading. Some people use two separate small joints, one from each side, instead of one long one through the middle. That also works and is sometimes easier to set up.
Step 5: seal the intersection
This is the most critical structural step. The joint where the crossbar meets the main joint needs to be airtight. If air leaks at the intersection rather than traveling through the hollow channels you made, the cross joint will burn unevenly and probably die out on the crossbar.
Tear a gum strip from a rolling paper. Lick it lightly. Wrap it around the intersection where the cross meets the main joint, pressing it firmly to seal any gaps. Apply strips to both sides of the intersection. You want the crossbar joint locked in place and sealed to the main joint paper on all sides. Work carefully. Some people use two or three gum strips per side to make sure the seal is complete.
Once the seals are applied, let them sit for 30 seconds to dry and set before handling.
Step 6: light it
You need three heat sources or one coordinated lighter pass. The goal is to get all three ends lit as close to simultaneously as possible. If you light the main joint tip first and then struggle to light both ends of the crossbar, the main joint will be burning down while the crossbar ends are still unlit, and by the time everything is going, you'll have a timing problem.
The best approach with two people: one person holds the cross joint at the filter and lights the main tip, while the second person lights both crossbar ends. If you're alone, light the main joint first, then quickly light the near crossbar end, then the far crossbar end, and put it to your lips immediately. The window from first end lit to drawing should be under 10 seconds.
Draw steadily and the smoke from all three burning columns should converge at the intersection and pull toward the filter. The first few draws establish the burn direction. Once it's going, maintain a slow, steady draw.
Common mistakes
No hollow channel in the cross joints is the most common reason cross joints don't work. If the center of the crossbar is packed solid, smoke can't travel inward to meet the main joint flow. Make sure you create that channel before threading.
Bad seal at the intersection is the second most common problem. Air takes the path of least resistance. If there's a gap at the intersection, smoke will escape there instead of traveling to the filter. More gum strips, better seal.
Cross joints that are too short to hold burn out fast. Make your main joint generous. A king-size joint gives you a better smoking window before the burn reaches the intersection and things get complicated.
Over-tightening the hole so the small joint tears is a frustration point. Work slowly. The needle is your friend. Open the holes patiently rather than forcing the small joint through.
A note on effort-to-payoff
A cross joint takes 20-30 minutes to build well the first time. It's worth doing at least once just for the experience. As a party piece or session centerpiece, it's unmatched. As an everyday smoking method, it's clearly impractical. Most people who build one are satisfied with having done it and then return to normal joints. That's a completely reasonable outcome.