Why people use joint rollers
Rolling a joint by hand takes practice. Some people enjoy the ritual of it, but a lot of people just want a consistent result without spending ten minutes fighting with a paper. A joint roller machine takes the frustrating part, the tuck, out of the equation entirely. You load material, close the machine, feed a paper, and get a tight, even cylinder in about 15 seconds.
That is the honest sell. It is not magic. You still need properly ground material, the right paper size, and a basic understanding of what you are doing. But the margin for error is much smaller with a machine than with bare hands, especially for beginners.
The other reason people use rollers is consistency. If you are rolling multiple joints for a session or pre-rolling for a group, a machine produces uniform results every time. Hand-rolled joints vary. Some are tight, some are loose, some look like a shaky cylinder, some are works of art. A machine rolls the same joint on the tenth try as it did on the first.
How a manual joint roller works
A standard manual rolling machine (sometimes called a cigarette rolling machine or roller) is a simple mechanism. It has two rollers, usually made of rubber or soft plastic, held in a hinged frame. When you open the machine, you drop material into the channel between the two rollers. Close the machine, which brings the rollers together to form a cylinder from your material. Insert a rolling paper along the front roller with the glue strip facing up and facing you, and roll the machine forward (away from you) to feed the paper around the material. Lick the glue strip as the last bit of paper feeds through, and you have a finished joint.
That is it. The whole process takes about 15 seconds once you know what you are doing, and maybe 45 seconds the first time you try it.
The key insight is that the rollers do the tuck for you. That is the step hand-rollers struggle with. The machine wraps the paper around the material cylinder mechanically, which is why the results are so consistent.
Manual vs electric joint rollers: a real comparison
This is where people get confused because the terms are used loosely online. There are several distinct categories of machine, and they are not equivalent.
Manual roller (the $10-15 device)
This is what most people picture. A small handheld frame with two rubber rollers. You do the mechanical work of rolling by turning a thumb wheel or sliding the machine forward. Popular brands are RAW, Elements, and Zig-Zag. They cost between $8 and $20 depending on brand and size. They are small, lightweight, pack flat, and work with standard rolling papers. The main limitation is that you need to load each one individually and the process still requires some manual attention.
Pros: cheap, reliable, almost zero learning curve, pocket-sized, works with any standard paper.
Cons: one joint at a time, still manual effort, rubber rollers wear out after heavy use and need replacement, some cheaper models have frame tolerances that are off and produce slightly irregular joints.
Cone filling machines
These are a different category. Instead of rolling a flat paper, you start with a pre-rolled cone (paper already shaped, with the filter already attached) and use a device to fill it with ground material. Some cone fillers are just a vibrating base that shakes material down into a cone. Others are multi-cone machines that can fill 6 to 20 cones at once by vibrating a loading tray.
The appeal here is speed when you need to pre-roll many joints. Cone filling machines are popular for home pre-roll batches and for small-scale use. They do not actually roll anything. They just fill cones, which you then pack and twist closed. If the cone does all the shaping work, this is much faster than rolling from scratch.
Pros: very fast for batch production, consistent density, works well with pre-made cones.
Cons: you are reliant on buying pre-made cones (ongoing cost), not useful for rolling flat papers, and the quality of the final product depends heavily on the cone quality.
Electric joint rolling machines
True electric joint rolling machines exist, but they are much less common than the marketing might suggest. What is often sold as an "electric joint roller" is really just an electric cone filler or a motorized version of a cone-loading device. A genuinely automatic machine that takes loose material and produces a finished rolled joint from flat paper is expensive, bulky, and mostly found in commercial pre-roll production settings.
For home use, the honest comparison is between a manual rolling machine and a cone filling setup. Electric devices in the affordable range ($30-$80) are almost always motorized cone fillers.
Pros: fast batch output, less physical effort for high-volume users, good density control on models with vibration.
Cons: expensive relative to manual rollers, bulky, maintenance required, pre-made cones add ongoing cost, not truly portable.
Head-to-head summary
| Type | Price | Speed | Portability | Best for |
|---|---|---|---|---|
| Manual roller | $8-20 | ~15 sec per joint | Pocket-sized | Daily use, beginners, travel |
| Cone filler (manual) | $15-40 | 1-2 min for 6 cones | Medium | Batch rolling at home |
| Electric cone filler | $30-80 | Fast for large batches | Desk only | High-volume home use |
| Commercial pre-roll machine | $500+ | Very fast at scale | Not portable | Dispensaries, production |
How to use a manual rolling machine properly
Open the machine by pulling the rollers apart at the hinged end. The two rollers should splay open, creating a loading channel between them.
Place your filter or crutch at one end of the channel before adding material. Position it so it sits vertically between the two rollers, roughly where you want the filter end of the finished joint. If you are using a pre-cut filter tip, make sure it is already rolled and firm before loading.
Add your ground material into the channel between the rollers. Distribute it evenly from the filter toward the open end. How much material fits depends on the machine size. A 70mm rolling machine holds around 0.5 to 0.8 grams comfortably. Do not overfill. Overfilling is the number one mistake beginners make with rolling machines. The material should fill the channel without bulging past the roller edges.
Close the machine firmly, bringing both rollers together. Most designs click or close by feel. Give the roller a few forward rotations (thumb wheel or the upper roller) to compact the material into a cylinder inside the machine. You will feel resistance change as the material forms. Four to six rotations is usually enough.
Take your rolling paper and slide it into the machine between the two rollers, starting at the near edge (the side facing you). The glue strip should face toward you and sit at the top, facing upward. Insert the paper until about 5mm of paper is through the machine, just enough to grip.
Roll the machine forward (away from you), feeding the paper through. The paper wraps around the material as the rollers turn. Roll until only the glue strip is still exposed at the top. Lick the glue strip at this point, then continue rolling until the glue strip disappears into the machine and seals against the paper underneath it.
Open the machine. Remove your finished joint. It should be firm, even, and have the filter at one end. The open end can be twisted or left as is for immediate use.
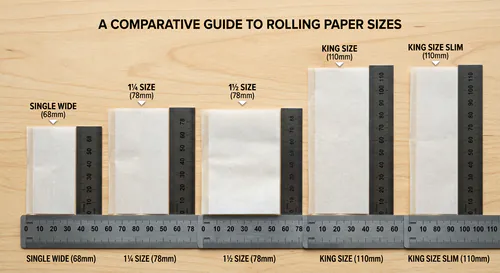
Paper compatibility: what fits and what does not
Rolling machines are sized to specific paper dimensions. A 70mm machine works with standard 1 1/4 size papers. A 78mm machine handles slightly longer papers in the same general category. A 110mm machine is for king-size papers. Match the machine size to the paper size you want to use.
Using a paper that is too small for your machine usually results in the paper feeding through before you can get the glue strip to seal. Using a paper that is too wide (taller than the roller gap) causes tearing or jamming.
Most major paper brands (RAW, Elements, OCB, Zig-Zag) are cut to standard dimensions that work with standard machines. Off-brand papers occasionally have slightly different dimensions and can cause feeding issues. If a paper is not feeding cleanly, try a different brand before assuming your machine is broken.
For a deeper look at paper options, sizes, and materials, the rolling papers section covers what is available, including custom and branded options.
Getting the grind right for machine rolling
A rolling machine is not forgiving of bad grinds. Too coarse and the material clumps, creates voids in the cylinder, and produces a joint that burns unevenly. Too fine (powdery) and the material falls through the roller gap during loading, produces a very tight joint that is hard to draw through, and jams the paper feed.
The ideal grind for machine rolling is medium-fine with no large pieces. Think dried herbs, roughly consistent particle size. A standard 4-piece grinder run for a normal amount of time produces material that works well in most machines. If the material feels notably sticky or wet, let it air-dry for 10 to 15 minutes before loading. Sticky material does not flow well in the roller channel and tends to clump.
Stems are worse in a machine than they are in hand-rolled joints. A stem that catches in the roller mechanism can tear your paper just as it is about to seal. Remove all visible stems during grinding.
Cone rolling machines: how they differ
Dedicated cone machines (the kind that fill pre-made cones rather than rolling flat papers) work on a completely different principle. You load the cones into holders, fill the cones with ground material from above, and then use a vibrating or tamping mechanism to settle the material evenly into the cone.
The most common home version is a flat loading tray with a vibrating base. You set 6 or 12 cones in the tray, overfill from above with a coarser grind than you would use for a flat-paper machine, vibrate to settle, add more material, repeat until the cones are full, then use a packing tool to tamp the top before twisting closed. The whole batch takes 5 to 10 minutes once you have your workflow down.
Grind size matters differently here. A slightly coarser grind settles better under vibration than a fine grind does. Very fine material can pack too tightly and restrict airflow. Experiment with your grinder settings a bit to find what works with your specific cone filler.
Cleaning and maintaining your rolling machine
Rubber rollers pick up resin over time. A sticky roller does not feed paper smoothly and can tear papers as they feed through. Regular cleaning extends roller life significantly.
For cleaning: use a small piece of rolling paper or a thin cloth to run through the machine after each session. This removes loose material. For deeper cleaning, a cotton swab lightly dampened with isopropyl alcohol can clean the roller surfaces, but let them dry completely before use. Do not submerge the machine or get any of the mechanical components wet.
Rubber rollers eventually harden, shrink slightly, or develop surface defects after heavy use. When this happens, the machine starts producing inconsistent results or tears papers frequently. Replacement rollers are available for most popular machines and cost a few dollars. It is cheaper to replace the rollers than to buy a new machine.
Store the machine with the rollers open or only lightly closed. Keeping the rollers compressed for long periods can cause them to deform slightly over time.
Pro tips for consistently better results
Load the filter first, always. Trying to insert a filter into a machine after loading material pushes the material around and creates uneven density in the cylinder.
Fewer forward rotations before inserting the paper produces a looser joint. More rotations produce a tighter cylinder. Learn your preference. Most beginners go too tight on the compaction step and end up with joints that need serious effort to draw through.
Insert the paper squared up with the roller gap. If the paper goes in at a slight angle, it feeds unevenly and the joint ends up with the seam running diagonally. Take an extra second to align it straight before rolling the paper through.
If the glue strip is not sticking, your lick was too dry or you licked too early and it dried out. Lick as late as possible in the rolling process, right before the strip disappears into the machine.
For a hand-rolling alternative and technique comparison, see our guide on how to roll a joint by hand. The two techniques are not mutually exclusive. Most people who can roll well by hand still use a machine when they want consistency or speed.
Who a rolling machine is actually for
Rolling machines are not just for beginners. Experienced rollers use them. Anyone pre-rolling multiple joints uses them. People with arthritis or limited hand mobility rely on them. People who want consistent joints for group sessions or events use them. Anyone who has ever rolled a beautiful joint and then immediately rolled a terrible one and wondered what changed will appreciate the consistency.
The argument against rolling machines is usually about the ritual of hand-rolling. That is a real and valid preference. But it has nothing to do with the quality of the finished joint. A well-loaded rolling machine produces a result that is indistinguishable from a well-rolled hand joint and consistently beats a mediocre hand roll.
For more detail on the hand-rolling approach and how it compares in practice, see our full comparison of rolling methods.