Rolling tray organizer setup: how to keep all your smoking accessories tidy
Most people who use a rolling tray are already halfway to an organized setup. The tray itself forces some order onto the process. But there's a difference between "I can find my papers eventually" and a setup where everything has a place and rolling takes 60 seconds instead of five minutes of hunting.
This guide is practical. I'll go through each item that belongs on a tray, where it lives, and the small things you can do to stop your setup from turning into a mess every few days.
Start with tray size
Organization is much harder on a tray that's too small for what you're trying to fit. A small tray (roughly 7 by 5 inches) works if you keep things minimal: grinder, papers, lighter, nothing else. A medium tray (11 by 7 inches) fits everything most people need. A large tray (14 by 10 inches) is what you want if you're adding a stash jar, filter tips, and maybe a poker or tamper.
If you find yourself stacking things on top of each other constantly, the tray is too small for your habit, not the other way around. Upgrade the tray before you try to optimize placement.
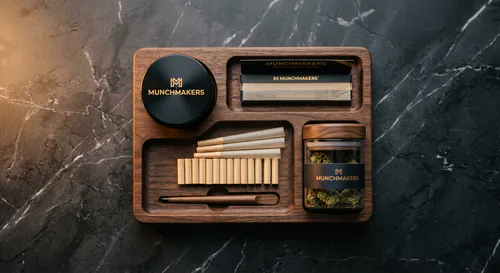
The core five items
Every tray setup centers on the same five things, even if yours looks different. Grinder, papers, filters, lighter, and a storage spot for your herb. Those five items need positions that don't change. When you put things back in the same spot every time, you stop thinking about where they are.
The grinder goes in the back corner. It's the tallest item and the heaviest, so putting it at the back keeps the tray stable and makes the front of the tray clear for active rolling. Back left or back right is personal preference. I put mine back left because I'm right-handed and I reach for it less frequently than I reach for papers.
Papers sit flat in the middle or in a designated paper slot if your tray has one. Some metal trays have a small groove or ledge specifically for a pack of papers. If yours doesn't, a small binder clip or a rubber band around the papers keeps the pack flat instead of sliding around.
Filter tips are the easiest thing to lose on a tray. Keep the booklet tucked under the paper pack or in a small container. A tiny ceramic ramekin or a shot glass works well here. One container on the tray dedicated to filters and nothing else means you never dig for them.
The lighter clips to the edge of the tray if you have a clip, otherwise it sits front-right on the tray surface. Keep it in the same corner every time. Running a lighter clip on the tray edge is worth buying if you've ever spent three minutes looking for a lighter that was six inches away from where you were looking.
Stash storage on the tray
Whether you keep your stash on the tray depends on how much you have and how often you access it. A small glass jar with a tight lid works well on a large or medium tray. Anything that seals properly is fine. The jar goes in the back, next to the grinder.
If you're keeping a significant amount of herb and want discretion, a tray with a magnetic lid solves both storage and the open-display problem at once. The lid closes over everything and keeps the contents dust-free. For people who share a home and want their setup contained, this is a more practical choice than an open tray.
Cleaning tools
A small brush for sweeping the tray between sessions makes a real difference in keeping the surface usable. The kind of brush that comes with some grinders works fine. A one-inch paintbrush from a hardware store costs $1 and does the same job. Brush it into a trash bin before each session, not after, because after you've already moved everything and the tray is cluttered.
A poker or toothpick holder is worth adding if you smoke joints with filters. One small cup on the tray edge, half a dozen wooden toothpicks, done.
What doesn't belong on a rolling tray
Phones, keys, loose change, and anything that isn't specifically part of your smoking setup shouldn't live on the tray. The tray is a dedicated workspace, not a catch-all surface. Every non-tray item you put on it is something you'll move or lose when you're rolling.
More than one lighter is usually unnecessary. One is always low on fuel and sitting there taking up space. Keep one lighter on the tray and your backup in a drawer.
Trays with built-in organization
Some rolling trays come with raised compartments or inserts designed to hold specific items in specific spots. These work well if the compartment layout matches how you actually roll. They're less useful if the compartments are the wrong shape for your papers or grinder.
For most people, a flat tray with good dimensions works better than a tray with aggressive molded sections, because flat trays adapt to whatever tools you prefer. Organization comes from habit, not from the tray forcing your hand.
Maintaining the setup
The honest answer to keeping a rolling tray organized is one rule: put things back after every session. Not sometimes. Every time. It takes about 15 seconds. If you build the habit, you'll never have a chaotic tray. If you don't, no amount of containers and clips will help long-term.
Refill papers and filters before you run out, not after. Set a threshold for yourself: when the paper pack is down to the last few sheets, replace it. When the filter booklet is half gone, order another. You don't want to hit empty mid-session.
For more on what accessories pair well together, see our guide to rolling tray materials and how each material handles daily use. If you're adding a lid to your setup, magnetic lid rolling trays covers the options worth considering. Our full list of smoking accessories has everything that could slot into a tray setup.