Was Sie eigentlich brauchen, bevor Sie beginnen
Ein Gelenk zu rollen ist nicht kompliziert, aber die falschen Materialien machen es viel schwieriger, als es sein muss Bevor ich mich mit der Technik beschäftige, möchte ich die Zahnradliste abdecken, denn Anfänger haben normalerweise mehr Schwierigkeiten, das falsche Papier zu verwenden, als mit einer echten Fertigkeitslücke.
Sie benötigen: Rollpapiere, einen Filter oder eine Krücke (sehr zu empfehlen), gemahlenes Unkraut, und etwas zum Verpacken Ein Stift, ein Essstäbchen, oder auch ein Zahnstocher funktioniert zum Verpacken A Walzblech Ist nicht erforderlich aber es verwandelt ein Streuchaos in etwas überschaubares Alles bleibt an einem Ort und man kann loses Material zurück schütten ohne danach zu jagen.
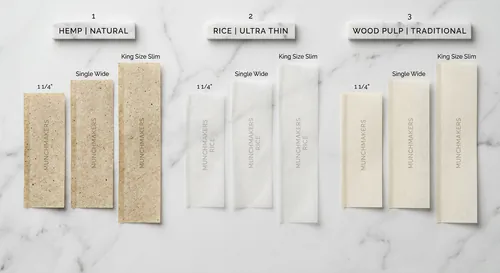
Papierwahl zählt Dünne, leichte Papiere sind für Anfänger schwerer zu handhaben, sie reißen leicht und der nasse Klebestreifen gibt einem nur sehr wenig Fehlerspielraum Ein Standardpapier der Größe 1 1/4 in Reis oder Holzschliff ist einfacher zu bearbeiten als ultradünne oder transparente Papiere, wenn man einmal konsequent rollen kann, kann man mit dünneren Optionen experimentieren, vorerst bleibt man bei etwas, das nicht zerfällt, wenn es durch die Handhabung feucht wird.
Die Papiergröße bestimmt die Fugengröße Ein einbreites Papier gibt Ihnen eine kleine, enge Verbindung A 1 1/4 gibt Ihnen mehr Raum zum Arbeiten, eine Standard-Fugengröße, und ist das, was die meisten Tutorials vermuten, dass Sie verwenden Kingsize ist mehr, als die meisten Leute für ein erstes Gelenk wollen Beginnen Sie mit 1 1/4 und steigen Sie auf, wenn Sie größer wollen.
Einen Filter (Krücke) herstellen
Überspringen Sie den Filter, wenn Sie möchten, aber nicht. Ein Filter, auch Krücke oder Spitze genannt, erledigt mehrere nützliche Dinge: Er hält das Ende des Gelenks offen, sodass Sie es tatsächlich durchziehen können, er verhindert, dass Unkraut in den Mund fällt, er gibt Ihnen etwas zum Halten, wenn das Gelenk abbrennt, und es macht das Ganze strukturell einfacher zu rollen.
A Vorgeschnittene Filterspitze Ist die einfachste Möglichkeit Einfach in einer Akkordeonfalte von drei bis vier Falten zusammenfalten, dann das restliche flache Papier um den gefalteten Abschnitt rollen, um einen Zylinder zu erzeugen Das Ergebnis sollte fest genug sein, um seine Form zu halten, aber nicht so komprimiert, dass der Luftstrom blockiert wird Streben Sie einen Durchmesser an, der etwas kleiner ist als Ihr fertiges Gelenk.
Keine Filterspitzen? ein Stück dünne Pappe verwenden Visitenkarten funktionieren Ein zerrissenes Stück der Rollpapierhefthülle ist der traditionelle Ansatz Schneiden Sie einen Streifen von etwa 2 cm Breite und 5 cm Länge und falten und rollen Sie auf die gleiche Weise.
Der Filter sollte sich fest anfühlen aber nicht zerdrückt, wenn man das Ende schieben kann und es zusammenbricht, ist es zu locker, wenn man von selbst kaum Luft durchziehen kann, ist es zu eng Holen Sie es sich direkt bevor Sie mit dem Rollen beginnen, weil der Filterwechsel in der Mitte der Rolle Ihre Arbeit verschwendet.
Schleifen für eine Fuge
Ihr Schleifmaschine Material produzieren soll, das flauschig und mittelfein ohne große Brocken ist Große Stücke erzeugen tote Stellen und lassen die Fuge ungleichmäßig brennen Pulver ist zu fein und schränkt den Luftstrom ein Man möchte etwas, das von der Partikelgröße in etwa wie getrockneter Oregano aussieht.
Für ein Standard 1 1/4 Gelenk braucht man ca. 0,4 bis 0,7 Gramm Mahlgut Neue Walzen neigen zur Überfüllung, was die Tuck-Schritte härter macht Beginnen Sie mit weniger als Sie denken, dass Sie brauchen Eine gut gerollte kleinere Fuge raucht besser als eine klumpige überfüllte.
Entfernen Sie alle Stiele vom Grundmaterial vor dem Laden Ein Stiel, der durch das Papier sticht, erzeugt einen Riss, und sobald eine Verbindung reißt, sind Sie fertig.
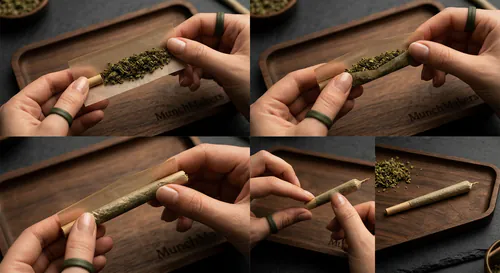
Der Walzprozess, Schritt für Schritt
Halten Sie das Papier mit dem zu Ihnen gerichteten Klebestreifen und dem Kleber oben Das Papier sollte in Ihren Fingern eine Muldenform bilden, legen Sie den Filter an ein Ende der Papiertrog Dadurch wird die Breite der fertigen Fuge bestimmt Die meisten Menschen positionieren sie am linken Ende, wenn sie Rechtshänder sind, am rechten Ende, wenn Linkshänder.
Verteilen Sie Ihr Grundmaterial gleichmäßig entlang der Papierrinne Halten Sie es vom Leimstreifen fern Formen Sie das Material unterwegs zu einem leichten Zylinder Sie formen die Fuge quasi vor, bevor Sie überhaupt mit dem Rollen beginnen Je gleichmäßiger Sie in diesem Stadium verteilen und formen, desto einfacher wird das eigentliche Rollen.
Nun kneift man das Papier zwischen Daumen und Zeigefinger Das Filternde des Gelenks hilft zu verstehen, wie viel Material sich anfühlen soll, wenn es richtig ist, man möchte, dass die Materialsäule auf ganzer Länge ungefähr die gleiche Festigkeit anfühlt, wenn eine Stelle offensichtlich dünner oder dicker ist, vor dem Rollen neu verteilen.
Rollen Sie das Papier zwischen den Fingern hin und her, ohne es wirklich zu klappen Das ist der Teil, der Anfänger verwirrt Sie verdichten und formen das Material, starten die Rolle noch nicht 5 bis 10 dieser Hin - und Herbewegungen sollten Ihnen eine feste Zylinderform im Inneren des Papiers hinterlassen, wenn das Material locker ist und herumfällt, haben Sie entweder zu viel oder zu wenig drin.
Jetzt zucken Mit den Daumen drücken Sie die nicht kleberne Seite des Papiers nach unten und um das Material herum, Ziel ist es, diese Papierkante fest über das Material zu falten, damit es einmal eingewickelt wird Dies ist der schwierigste Teil und der Schritt, bei dem die meisten Anfänger scheitern Das Papier muss unter das Material, nicht darin zerknittern.
Arbeiten Sie vom Filternde nach außen Der Filter gibt Ihnen einen festen Anker Das Papier zuerst um den Filter legen, dann langsam auf das andere Ende hinarbeiten, Spannung halten auch während Sie gehen Die Materialsäule hilft dem Papier, seine Form zu halten, während Sie stecken.
Ist der nicht-kleber Rand eingesteckt, lecken Sie den Klebestreifen leicht und rollen Sie das restliche Papier zum Versiegeln auf und ab, sättigen Sie den Klebestreifen nicht Ein leichter Leck reicht aus Drücken Sie den geklebten Rand beim Aufrollen fest nach unten, versiegeln Sie vom Filternde und arbeiten Sie auf die offene Spitze zu.
Die Kegelform im Vergleich zum geraden Zylinder
Sie werden feststellen, dass die meisten handelsüblich gewalzten Fugen und Vorwalzen kegelförmig, an der Spitze breiter und am Filternde schmaler sind, Anfänger, die von Hand rollen, landen in der Regel standardmäßig bei einem Zylinder, was in Ordnung ist Kegel sind vom Standpunkt des Rauchens aus nicht besser, sie lassen sich nur leichter rollen, wenn man es freihändig macht und mit einer größeren Menge Material an der Spitze beginnt Manche Leute bevorzugen sie ästhetisch.
Um einen Kegel absichtlich zu rollen, verwenden Sie etwas mehr Material zur Spitze hin als das Filternde, wenn Sie verteilen Ein Kingsize-Papier eignet sich auch natürlicher für Kegelformen Machen Sie sich bei Ihren ersten zehn oder zwanzig Gelenken keine Sorgen um die Form Holen Sie sich zuerst die Technik richtig.
Abschluss der Verbindung
Verwenden Sie einen Stift, einen Zahnstocher oder das Ende eines Essstäbchens, um die offene Spitze vorsichtig zu verpacken. Sie möchten, dass sich das Material leicht absetzt, ohne dass es so stark zusammengedrückt wird, dass der Luftstrom blockiert wird. Wenn Sie zu hart packen, entsteht eine Verbindung, die nicht zieht. Nur ein leichter Hahn, um die Füllung auszugleichen, reicht normalerweise aus.
Das überschüssige Papier an der Spitze verdrehen Das ist meistens kosmetisch, aber es versiegelt auch das Ende, damit nichts rausfällt Eine lockere Drehung ist in Ordnung, beim Anzünden brennt es sofort ab.
Führen Sie die Verbindung kurz unter einem Feuerzeug durch, bevor Sie sie anzünden, und führen Sie die Flamme an der Außenseite hin und her, ohne sie direkt zu verbrennen. Dadurch trocknet die Feuchtigkeit aus Ihren Fingern oder dem Leck aus und sorgt für ein gleichmäßiges Licht.
Häufige Fehler und was sie bedeuten
Gelenk läuft an einer Seite runter, das bedeutet meist ungleichmäßige Verteilung oder das Material wurde vor dem Rollen nicht konstant verpackt, eine Seite ist lockerer als die andere und brennt schneller, verlangsamt das, indem ihr den Finger benetzt und die schneller brennende Seite abtupft, um sie abzukühlen und den Brand zu verlangsamen.
Gelenk ist zu fest zum Durchziehen Du hast zu viel Material verbraucht, beim Walzschritt zu hart verpackt oder dein Filter ist zu komprimiert Leider gibt es keine tolle Fix-Mitternrauch Nimm das nächste Mal weniger Material und lass vor dem Einstecken mehr Platz im Trog.
Papier reißt beim Rollen Das Papier wurde nass, man hat beim Einklemmen zu viel Kraft aufgewendet, oder es ist ein Stiel im Material, nimm ein trockenes Papier, klemmte sanfter (langsamer), und entferne alle Stiele beim Schleifen.
Gelenk zerfällt oder ist zu locker Nicht genug Material, die Einlage war nicht fest genug, oder der Leimstreifen war nicht richtig abgedichtet Der Hin - und Herformschritt vor der Einlage verhindert das Mehr Zeit mit dem Verdichten verbringen, bevor man sich auf die Rolle einlässt.
Stattdessen eine Walzmaschine verwenden
Wenn die Handrolltechnik für Sie nicht klickt, ist das in Ordnung Eine Gelenkrollmaschine bewältigt die Spannmasse mechanisch, Sie laden das Material, schließen die Maschine, fädeln ein Papier durch, und sie rollt jedes Mal einen nahezu perfekten Zylinder, schneller, gleichmäßiger, und wirklich einfacher für Anfänger Der Kompromiss ist, dass Sie etwas Flexibilität über Größe und Form verlieren.
Eine vollständige Aufschlüsselung der Funktionsweise von Walzmaschinen und der zu berücksichtigenden Typen finden Sie im Gelenkrollenführung.
Und wenn Sie vor dem Kauf Papieroptionen besser verstehen möchten, ist die Leitfaden für die Größe des Walzpapiers Geht auf die genauen Abmessungen jeder Standardgröße ein, damit Sie die richtige für Ihre Rolle auswählen können.
Mit der Praxis besser werden
Das erste Gelenk, das du rollst, wird wahrscheinlich nicht schön sein Das wird erwartet Bis zum fünften wirst du ein gutes Gespür dafür haben, wie sich das Papier bewegt Bis zum zwanzigsten wirst du es ohne nachzudenken machen Die Technik wird intuitiv, sobald das Muskelgedächtnis da ist Die Tuck ist der einzige Schritt, der wirkliche Finessen erfordert, und selbst das wird schnell automatisch.
Kurzfristig kommt es darauf an, das Material gleichmäßig zu halten, nicht zu überfüllen und die Einstülpung abzuschließen, bevor das Papier aus den Händen nass wird, an diesen drei Dingen wird gearbeitet und der Rest folgt.