How to Roll with RAW Papers
Rolling your own joint is a skill that clicks after a few tries. RAW papers are a solid choice for it — they're made from natural, unrefined plant fibers, burn clean, and don't add much papery taste to the smoke.
Here's how to do it from start to finish.
Why RAW Papers
RAW papers skip the chlorine and heavy chemical processing most brands use. The result is a noticeably cleaner burn that doesn't compete with the flavor of your herb. They're also unusually thin for an unbleached paper, which means slower, more even combustion.
RAW makes the full range of rolling supplies — papers in multiple sizes, pre-rolled cones, filters, and rolling trays — so you can build out your setup with one brand if you want.
What You'll Need
Get these together before you start:
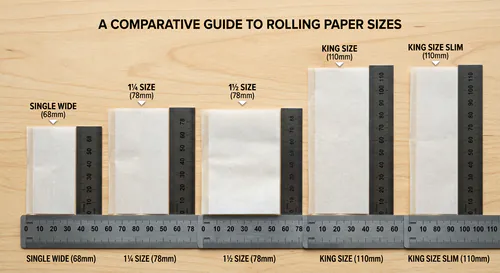
- RAW rolling papers in your preferred size (single wide for smaller joints, king size for bigger ones)
- A grinder to break up your herb into a consistent, fluffy texture
- Filters or tips — optional, but they give you something to hold and keep herb out of your mouth
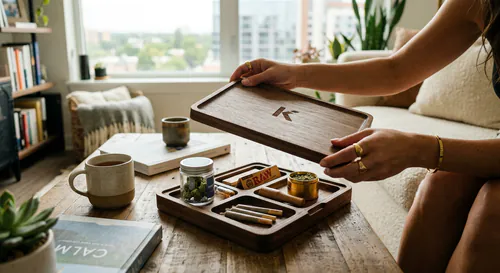
- A rolling tray to keep your workspace organized and catch any spills

Step-by-Step Rolling Instructions
1. Grind your herb
Run it through a grinder until it's evenly broken up and fluffy. Avoid grinding it into powder — fine material clogs the paper and makes rolling harder.
2. Set up your filter (optional)
Roll a small filter tips into a cylinder or fold it accordion-style. Place it at one end of the paper before you add any herb. Once it's in there, it acts as an anchor while you roll.
3. Load the paper
Hold the RAW paper with the gum strip facing up and away from you. Spread your ground herb along the crease in the center. Don't pack it in — you want a loose, even distribution. Overfilling is one of the most common reasons rolls go sideways.
4. Shape it
Pinch the paper between your thumbs and forefingers and gently roll it back and forth. You're not trying to roll the joint yet — you're just pressing the herb into a cylinder shape. Getting this right makes the next step a lot easier.
5. Tuck and roll
Once the herb is shaped, tuck the near edge of the paper down into the roll and start rolling upward. Keep it snug but not compressed — you need some airflow. This is the step that takes the most practice, so don't get discouraged if your first few don't look great.
6. Seal it
Lick the gum strip lightly and press it down as you finish the roll. A little moisture is all you need — too much and the paper tears. Just run your tongue across it once and press down firmly.
7. Finish the end
If you used a filter, you're done. If not, tap the open end on a hard surface to settle the herb, then twist the tip closed to keep it from spilling.
Things That Help
A few things that make a real difference once you're past the basics:
Keep your herb on the fluffier side. Ground too fine, it clogs and clumps. Ground too coarse, it burns unevenly and the paper drags.
Start with less herb than you think you need. A smaller, well-rolled joint smokes better than a fat one that won't draw.
If hand rolling is giving you trouble, a rolling machine is worth trying. They're inexpensive, produce consistent results, and there's nothing wrong with using one.
A rolling tray is underrated. Having a dedicated workspace means you're not chasing herb across your table, and cleanup is actually easy.
Common Mistakes
Overfilling is the biggest one. The paper can only hold so much before it won't roll cleanly. If you're struggling to get the tuck started, you probably have too much in there.
Rolling too tight is the other common problem. A joint packed like a cigarette won't draw properly. You want it firm enough to hold its shape but still have some give.
On the seal — press it down firmly and hold it for a second. If you just lick and let go, it might come unstuck as it dries.
Advanced Techniques
Once the basic roll feels comfortable, there are a few variations worth knowing:
Cone rolling tapers one end so there's more herb at the smoking tip and less at the filter. It changes how the joint burns and is worth experimenting with once you're comfortable with the straight roll.
The backroll technique uses the paper inside-out so less paper ends up in the finished joint. It's an acquired skill but cuts down on papery taste if that's something that bothers you.
Pre-Rolled Cones
RAW also makes pre-rolled cones if hand rolling isn't your thing. They come already shaped — you fill them with ground herb, pack it down gently with a pen or dowel, and twist the end closed. No rolling skill required.
Cones are also useful when you need consistency across a batch, or when hand dexterity is an issue.
Picking the Right Rolling Papers
RAW makes papers in a few different sizes and materials:
For size, single wide is smaller and tighter, 1¼ is the standard most people start with, and king size is for bigger rolls. If you're not sure, start with 1¼.
For material, RAW offers classic (unbleached hemp), organic hemp, and a few specialty options. All are unbleached and naturally processed. The differences are subtle — classic is the most widely used.
All RAW papers are thinner than most competitors, which is part of why they burn the way they do.
Getting Better at It
The first handful of rolls will probably be uneven. That's just how it goes — rolling is a physical skill and it takes repetition to develop muscle memory for the tuck-and-roll motion. Most people find that after 10 or 15 tries, it starts to click.
Keep your setup consistent: same workspace, same amount of herb, same paper size. Changing too many variables at once makes it harder to figure out what's working.